Magic Sheets: Revisited
In 2018, I wrote an article about theatrical magic sheets for the UsedLighting.com blog – it went on to be one of their most viewed pieces, and to this day I get comments about it when I meet students and teachers around the country. I thought it might be time for a little refresh on the subject, since it's been over 6 years since that original post! Hope you find some useful information that you can bring to your own work.
Introduction
One of the most important pieces of paperwork in theatrical lighting is the magic sheet. It's a single document that simplifies the entire lighting rig down to a page or two, allowing the designer to quickly find and recall channels and groups during programming and tech.
There are many different ways to make a magic sheet and many different visual styles – the thing about magic sheets is that there really are no "standard" layouts or rules like there are with some other lighting documentation. The magic sheet really just has to be useful to the designer.
Throughout this post, I'll be referring to my process and my way of doing things – remember that this is just my approach and that everyone you talk to will have a different method or opinion – and that's okay! Take the things that work for you, and leave the things that don't.
What is a magic sheet, anyway?
Simply put, a magic sheet is a document containing a simplified visual representation of the lighting rig as a whole, typically divided by systems of light.
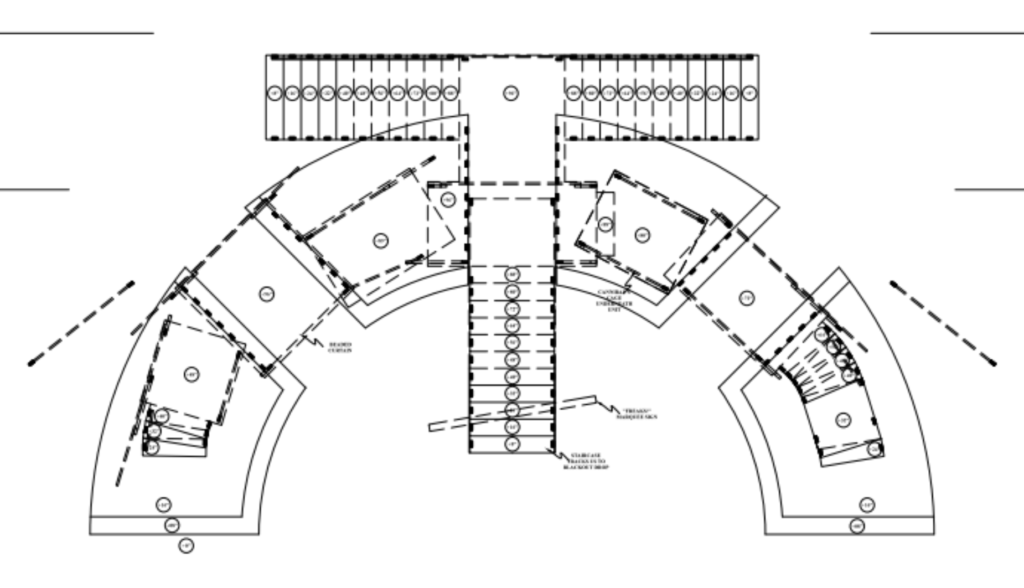
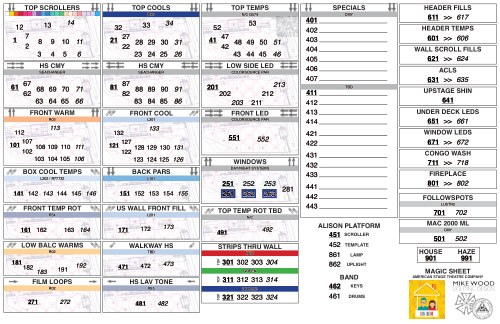
This magic sheet for the off-broadway hit Dungeons & Dragons: The Twenty-Sided Tavern which, at the time of this writing, is currently running in NYC at Stage42.
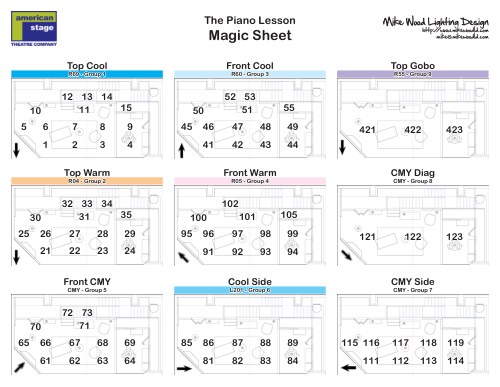
Each little box is an individual lighting system with a top-down view of the stage. Generally, the channel numbers are superimposed over the part of the stage that the lights will focus on, with some exceptions.
The direction arrows help with finding systems of light quickly during tech. I also arrange similar systems in the same row or column of the sheet. For instance, in the TST example, all of the moving light systems are across the very top of the page. Below that are the top systems, then the sides.
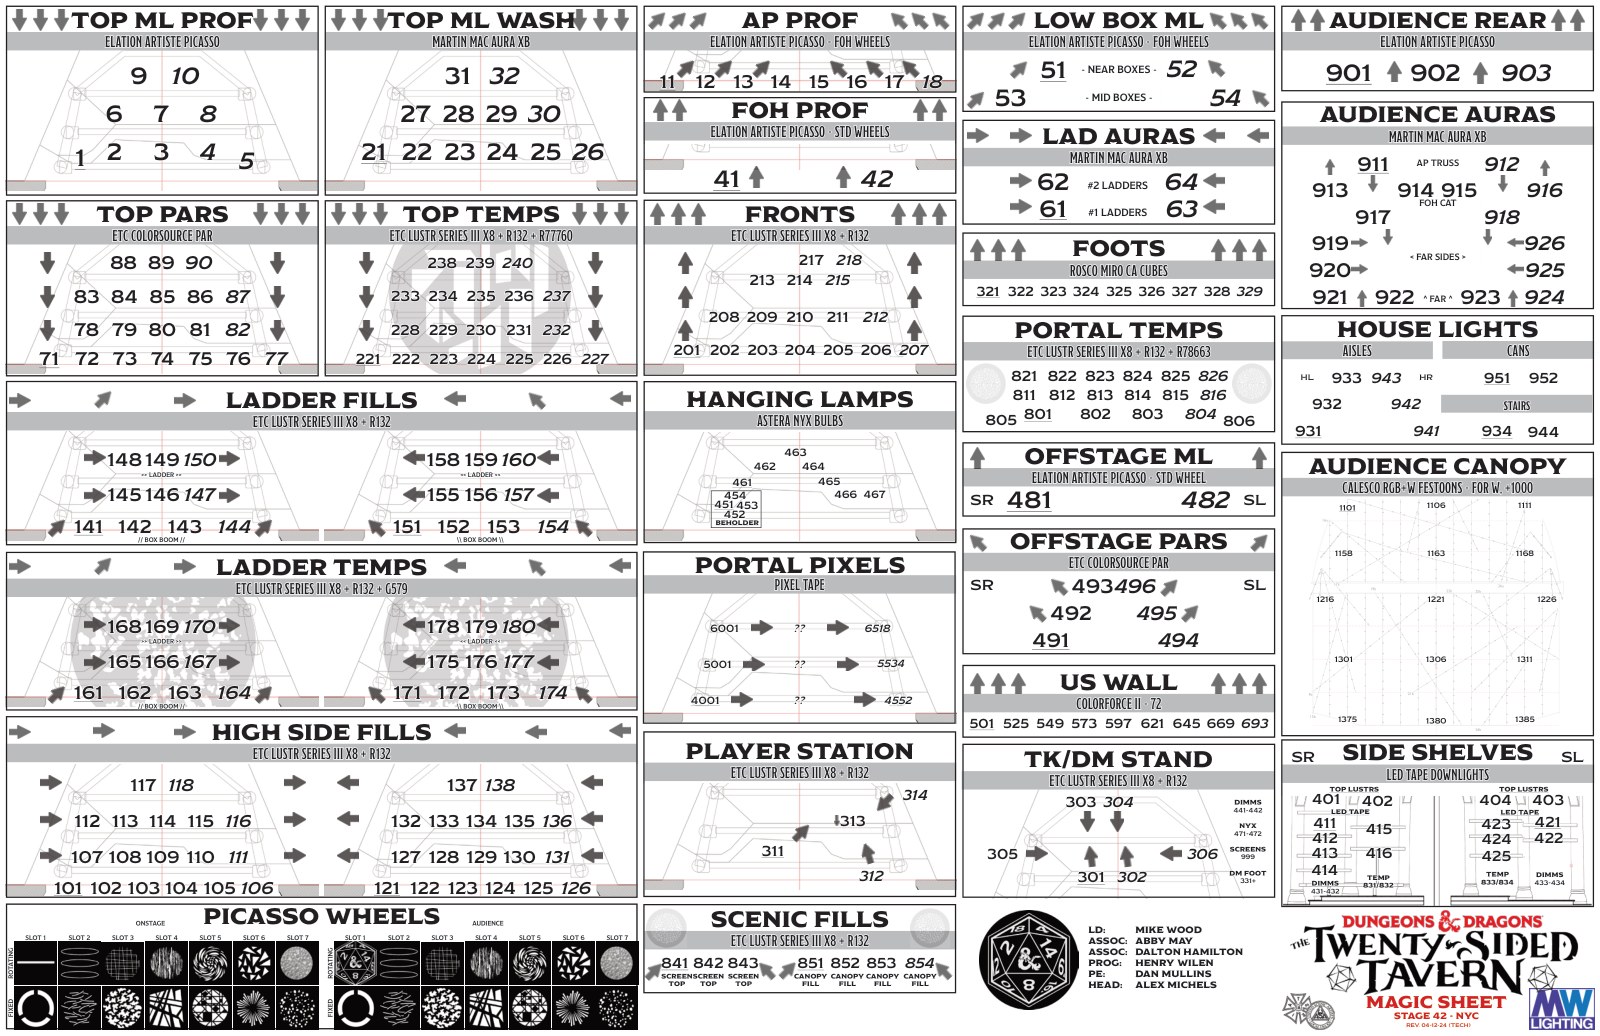
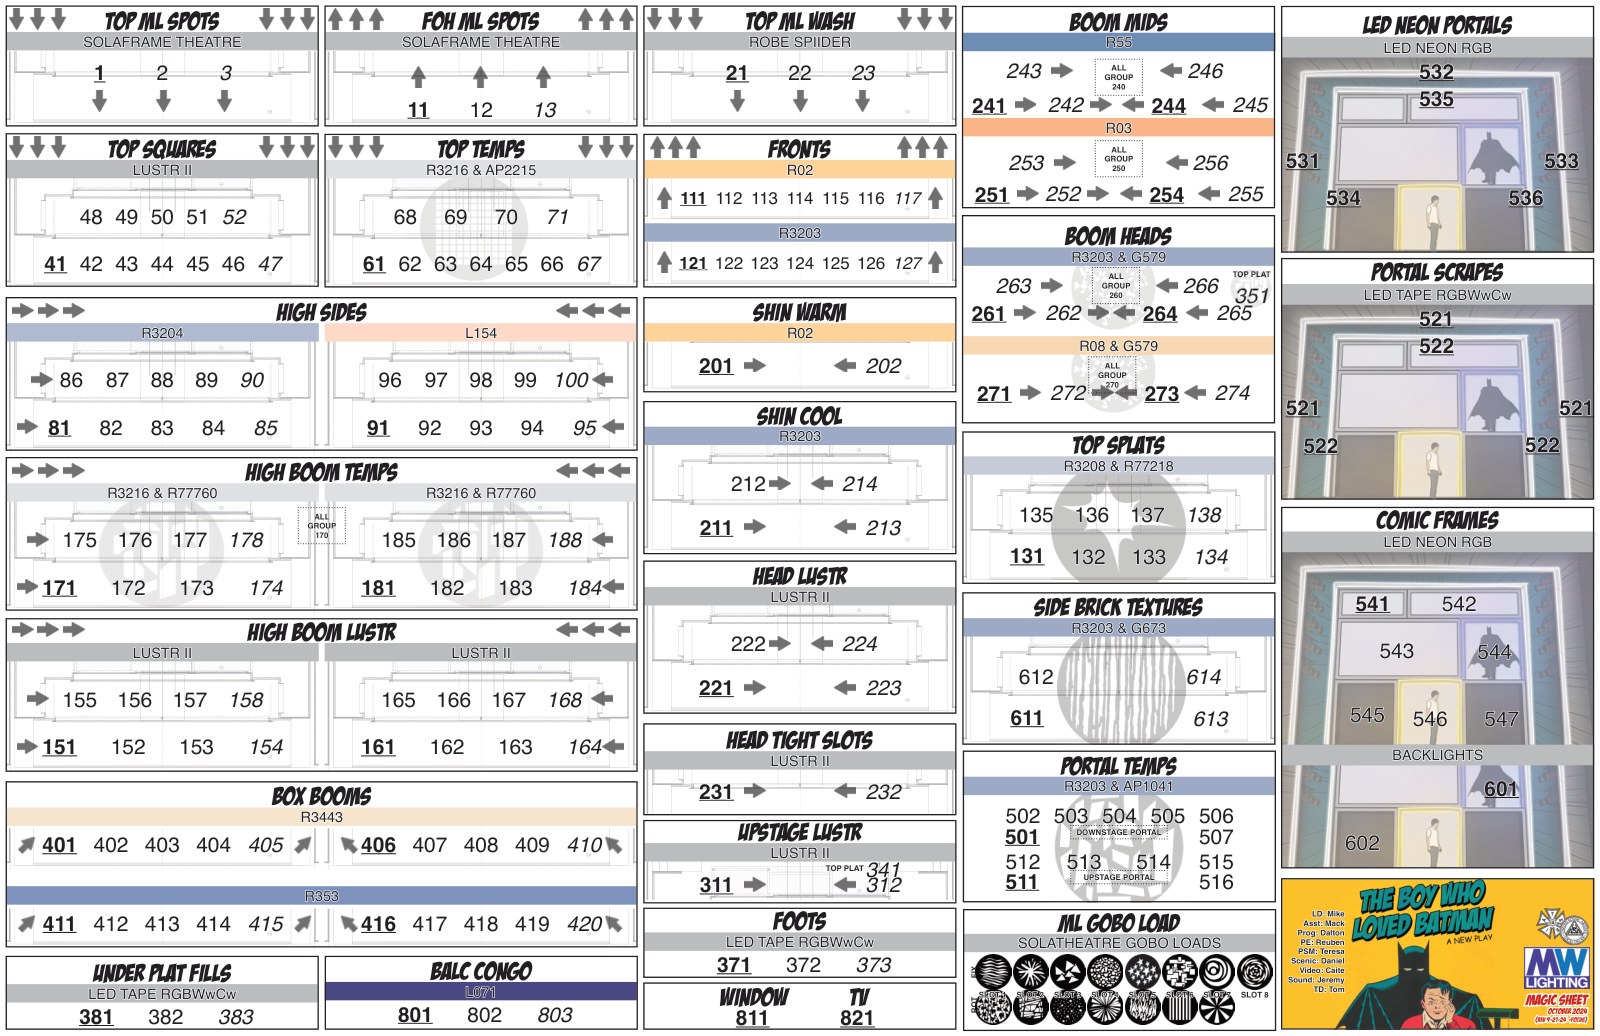
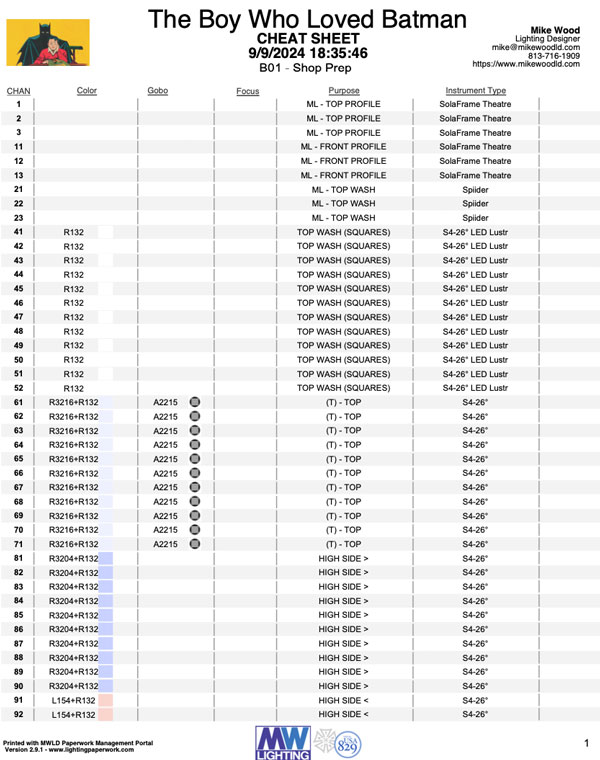
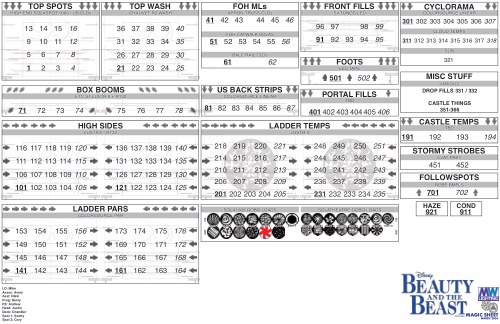
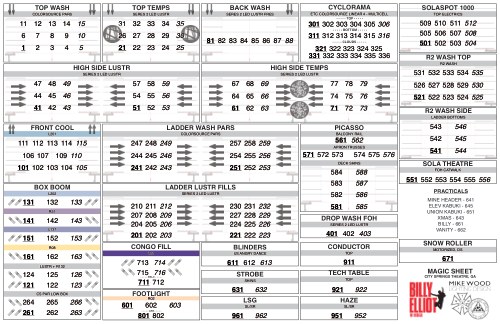
We were fortunate on TST – every single light could change color! On shows with gel, I have a similar approach that includes color bars above each system to help quickly find the color / system that I am looking for. Have a look at the magic sheet from the world premiere of The Boy Who Loved Batman – you can see all kinds of conventional systems with gel that are color coded accordingly.
Anatomy of a sheet
Hover (or tap) any pin on the Twenty-Sided Tavern sheet to see what each piece does. Same data, ten different conventions working at once.
So, why not just use the lighting plot?
When I teach about magic sheets, this is typically the first question that gets asked. "Why not just use the light plot? All of the lights are already on it, why create this extra document?"
Well, a few reasons. First, typically light plots are very large pieces of paper. The smallest ones I typically print are still 24″ x 36″ – manipulating a page that large at the tech table would be distracting for everyone in the room – and I'd spend more time fumbling with the paper just to find the channels I wanted.
Even with a digital light plot, I'd be zooming all around and trying to find the information I need in between a whole bunch of information that I don't.
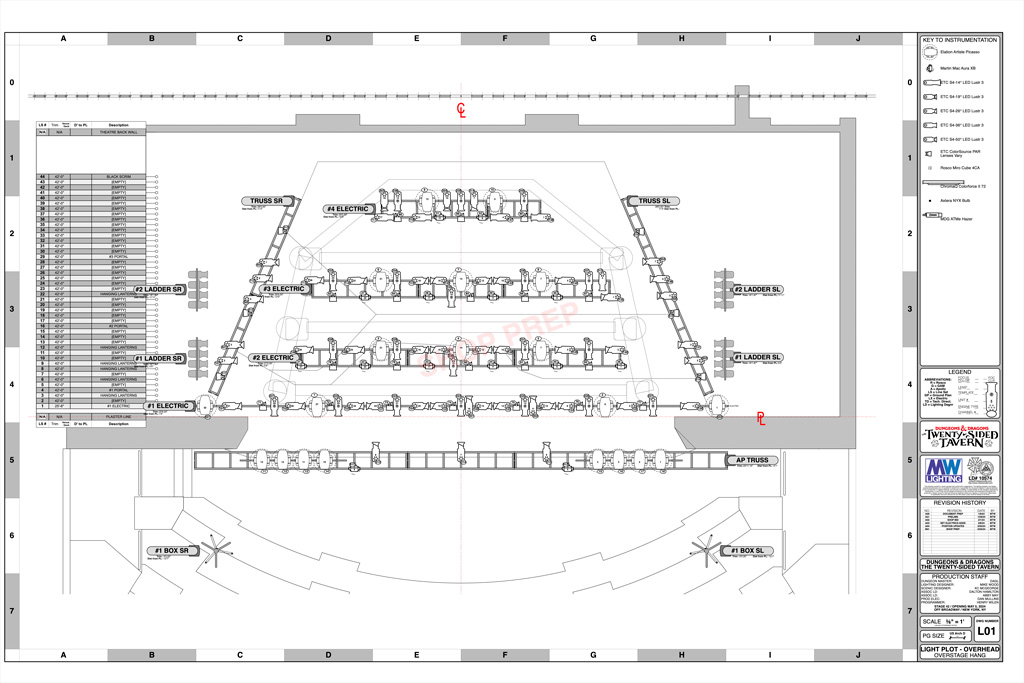
Let's use the overhead plot from Twenty-Sided Tavern as an example.
Try to find the top Mac Aura units in the overhead plot. Not so easy at first glance, huh? Compare the original plot (left) with the same plot with those units highlighted in red (right):

Now that we've found them, find their channel numbers. How long would that take? Too long, when you're trying to write 500 cues. Now, multiply that frustration for each system of light that you use in your show. See why it might be beneficial to simplify?
Compare the highlighted plot to the same area as it appears on the magic sheet:
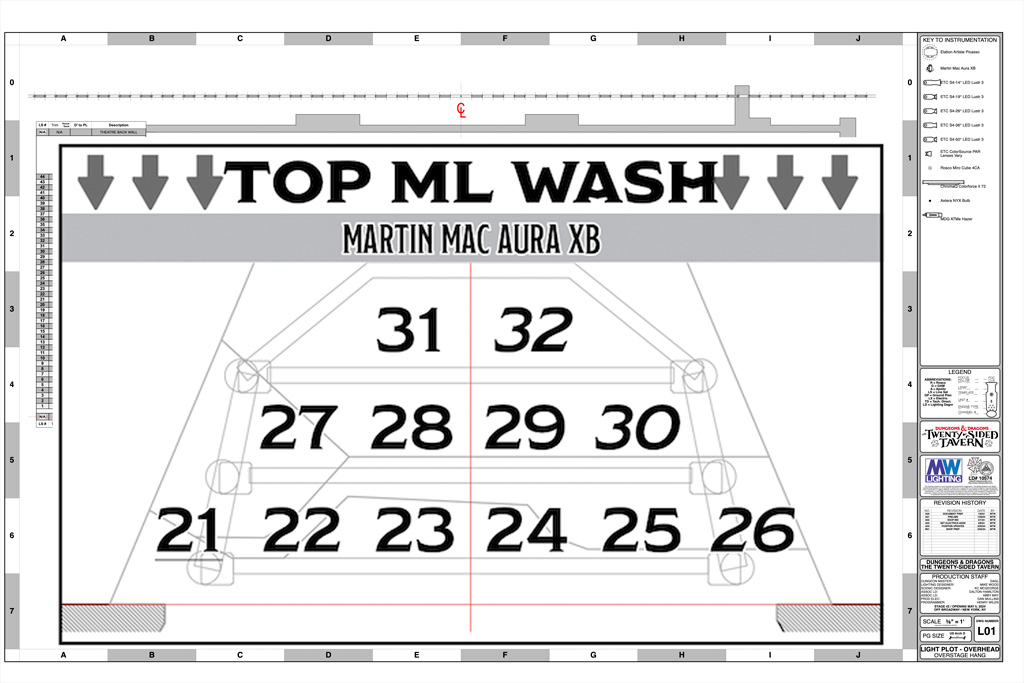
Already easier to read. I've taken what is a complicated and very large document with many numbers and simplified it down to a smaller document with more streamlined / easy to follow information.
Creating the magic sheet
They're exclusively the one piece of paperwork that I always make myself and never outsource to an associate or an assistant.
My magic sheets are typically the last piece of paperwork that is generated before I focus a show. I typically make them a few days before focus. Creating them myself allows me to become very familiar with the rig and helps me visualize what I'll do at the focus call. Sometimes, the plot and other paperwork have been done for a month or more and I've done other shows in the meantime – taking time to make the magic sheet gets me in the zone for that particular show. Every once and a while, it also exposes problems – but that's another story.
The first thing I do is print a cheat sheet from Lightwright or my own FileMaker tool which shows me the bare amount of information needed to create the magic sheet. Channel, color, gobo, and purpose. This sheet doesn't really help me know what light is going where, but it does give me a checklist of instruments in channel order that I can reference to make sure I've included every instrument. I typically print this document out and have a highlighter at the ready to check them off as I go.
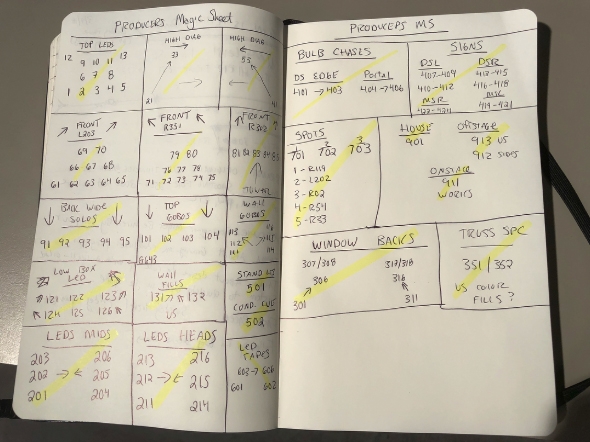
I used to make a hand-sketched version of the magic sheet before I started working on the digital one, but I honestly haven't done that in a long time. I think now I've got my system so refined and tuned that I can quickly create and edit without the need for this paper step, but I'm still including it in this post as it might be useful to you still!
Now, I'm ready to get started with the actual creation. I use Adobe InDesign to create my magic sheets, so I'll be referencing that for the rest of this blog, but you can take the things you need from it and use in your software of choice.
Gathering needed assets
First up is getting the various digital assets that I know I will need to create the magic sheet. This includes the background scenic imagery / ground plans, show logos, company logos, gobo images, and potentially fonts too, if I am feeling extra snazzy. For TST, we used the official D&D font. For Batman, we used the show's comic style font. But typically, I use Helvetica.
For gobos, I keep a pretty extensive catalog here that I built originally for my auto-insertion tools in FileMaker (see that lesson here!)
In Vectorworks, I will grab a quick screenshot of the scenic elements / ground plan that I need. For me, this is typically just going to one of my sheet layers and turning a bunch of things off, taking the screenshot, and that's it. I recommend making sure that you at least have your base ground plan, building architecture, plaster line, and center line visible in the screenshot. The center line will help with alignment.
Depending on the show and on the complexity of the drawing, it can also be useful to have your lighting positions turned on or at least greyed out in the background to help you align your lights.
Okay, but why InDesign?
InDesign is used to layout everything from books to newspapers and more. It's designed as a publishing tool, which makes it way more powerful than a word processing program, spreadsheet program, and yes, even Vectorworks. There is a pretty steep learning curve (as there is with any professional software) but once you use it, the flexibility and freedom it gives you to create eye-catching and highly useful paperwork is worth it.
Of course, it is very possible to use Vectorworks to create your magic sheets. In fact, many people (most people) do! I just prefer the flexibility and control that I get from InDesign.

Watch one come together
A live stream of me creating a magic sheet from scratch in InDesign – it's a few years old now, but the content is still super useful.
Let's dive in
You can download and experiment with the InDesign file from the TST magic sheet above! I'll be exploring it a bit deeper for the rest of this post, so you can follow along using the file. You might need to substitute fonts, but that's okay!
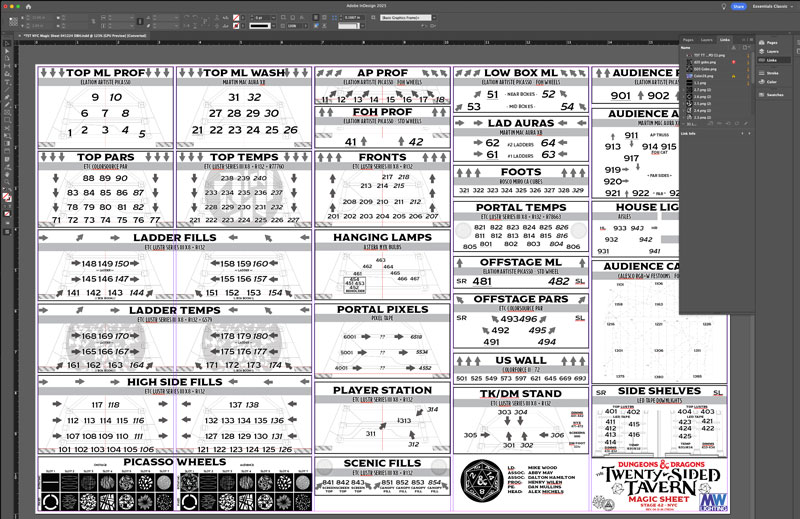
I tend to use the "essentials classic" workspace / layout in InDesign, mostly because I'm getting older and don't like finding where all the tools I use have moved. Here's looking at you, Vectorworks.
"Frame edges" are very helpful / useful as you're initially laying out your design. In the sample file, they're turned off. You can turn them back on manually using the view menu:

Layers and conventions
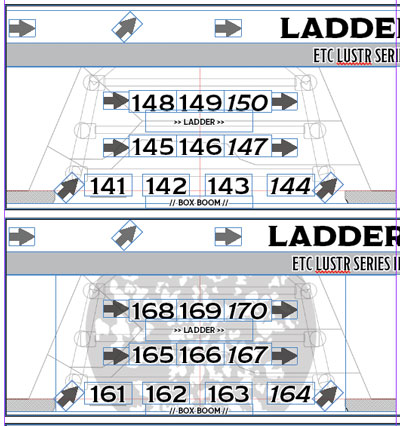
Each box is made up of several layers of items – the base layer is the ground plan image of the set. Sometimes I'll give that some opacity to fade it out a bit, but that really depends on what it looks like. On top of that, there are text boxes for each channel number so that I can move them all around as needed.
I use a few conventions throughout my magic sheets – group numbers are always indicated by an underlined number within the system. Subgroups are formatted to be in italics. I don't typically notate this anywhere on the magic sheet because typically my team and I are the only ones reading this document and we know the convention. If I were preparing a magic sheet for a house rep plot, I would probably include some kind of key.
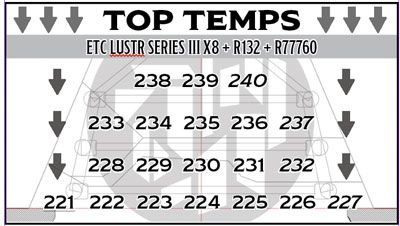
For example – in the "Top Temp" system, the entire group is channel 221, indicated by the underlined channel. There are four subgroups, by wing, numbered 227, 232, 237, and 240. I typically like my group numbers to always correspond to the actual channel numbers of the lights that are in them. I personally think it's very confusing for groups to be numbered 1, 2, 3, 4, 5 – but your mileage (and opinion) may vary!
Adding color swatches
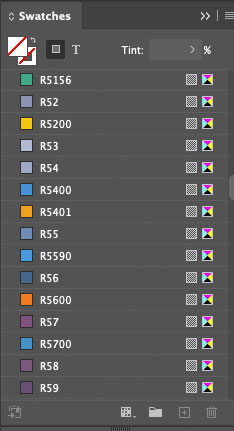
Of course, these swatches are close but not perfect approximations of the real-life gel colors. It's impossible to get a 1:1 translation but these get you pretty close using color values.
I have created a library of swatches for all major gel manufacturers which can be imported into most Adobe Suite applications. These are available to purchase here:
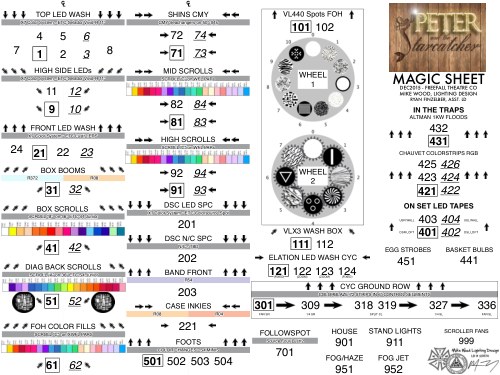
Moving light gobo wheels
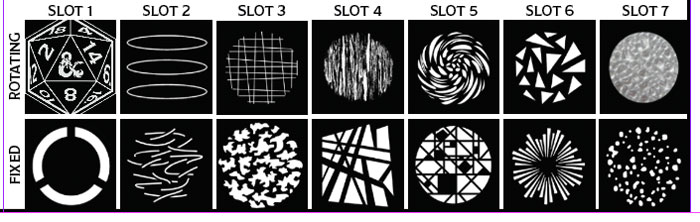
I like to include gobo images for my moving light wheels somewhere on the page or on a separate page. I'm sure to label the slot numbers as well as if the wheel is fixed or rotating.
Practical fixtures
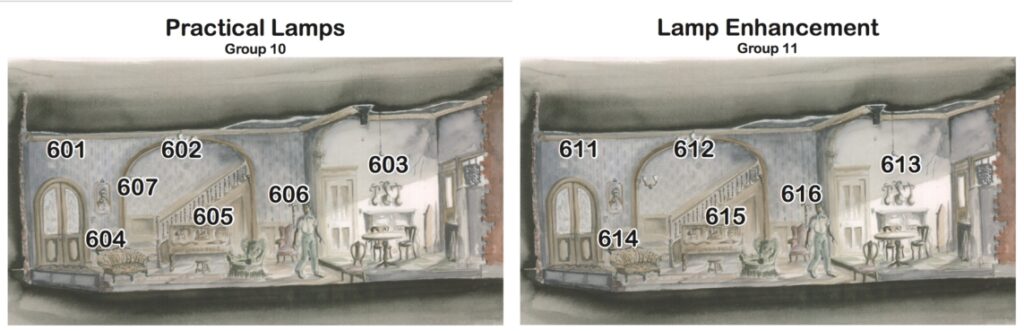
If you have renderings of your set, you can also pull these images into InDesign and then layer your channel numbers right over top. In this example, I have both the lamps themselves as well as units that I used for re-enforcement.
More styles
I keep a pretty deep repository of magic sheets that I've created for shows of all shapes and sizes going back to 2011. You can see my style progress over time, as they're all organized with years in the label.
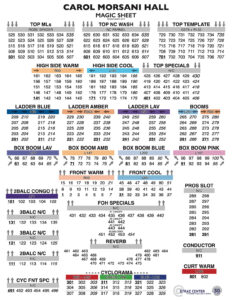
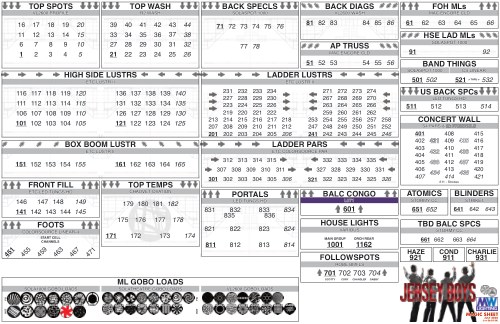
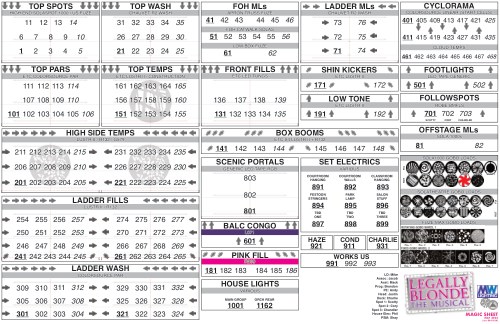
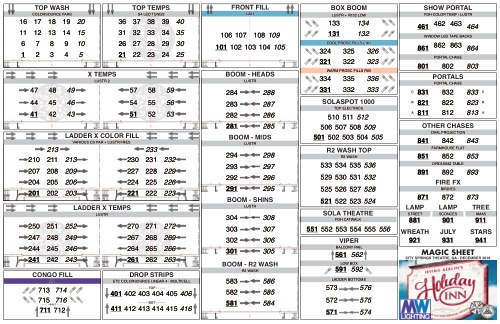
Because of the amount of lights in this rig, there's no way that my other style would work. The paperwork would be way too many pages! Plus, to be useful in a rep situation, we wanted to make sure the page could fit on one piece of printer paper. No easy task, but still pretty proud of how it turned out.
In the wild
A small sampler from over a decade of magic sheets — click through to the production, or browse them all in the gallery.


Printing the sheets
I like a paper copy of my magic sheet during focus and on the tech table. Call me old-fashioned, but I find comfort in the analog nature of it amongst the crazy digital world of the tech table.
I typically size and print my magic sheets on 11×17 (Tabloid) sized paper. I used to laminate them, but nowadays I find that I'm frequently editing or scribbling on the sheets so I opt instead for several copies printed out for me to use throughout the week(s). I often scribble in the margins as a way to fidget during tech – and sometimes by the end of a particularly long tech day, the sheet might not be very useful anymore.
Wrapping up
I hope that the information here, and the various samples, can be useful to you as you start to create your own magic sheets – remember, this is just one way to do it. You don't need to use the exact methods, tools, and software as me – but I hope that you're able to glean something useful from the content here! Be sure to show me what you create!
See more in the wild. Browse the magic sheet gallery — 60+ sheets from over a decade of designs, sortable by show type.