This site is currently in previews. If you spot an error or omission, please report it .

Report an error or omission

The address of the page you're on is included automatically, so Mike knows where to look.

Issue type (check any that apply)

Mike will review your note and update the page. Submissions go to websitedata@mikewoodld.com.

Blog

LD Photography

Today's post is all about shooting and editing photos of your shows as a lighting designer.

A quick disclaimer: I am a lighting designer, not a photographer. Something I say here may be technically wrong or make a real photographer's head start to steam. Apologies in advance. I'm showing my process and what has worked for me, and I'm always happy to learn new things and fix what doesn't work.

LD Photography, featured image

Why shoot your own shows

Early in my career, my first or second show ever, I realized very quickly how important it is to have good photos of your design to showcase the countless hours of work that go into making something happen. I also learned an important lesson: I couldn't trust other people to capture the photos I wanted.

I'm sure many of you have been in a similar boat. You're told "don't worry, we have a photographer coming in and you can have all of their shots," and then suddenly you have a folder (or back in the day, a CD) full of close-up images that aren't color corrected, are incredibly bright or incredibly dark, and are mostly unusable for you.

If you're like me, seeing bad photos of your work also leads to feelings of insecurity and doubt. You might know how great something looked in real life, but you have no evidence of it and might even feel ashamed to show it off. I went through that on many projects, and it wasn't until I really took a strong interest in learning how to shoot my own shows that I started feeling better.

Hopefully you can take a thing or two from this post that helps you document your work in a way that you can be proud of. Whenever I have an image here, I try to have all of the settings displayed with it.

Canon R5 with the RF 15-35 and RF 24-70 lenses, sitting on top of a magic sheet at the tech table

Selecting your gear

My Canon R5 with the RF 24-70 mounted, sitting on a tech table

At the time of this writing, there are SO MANY options out there that allow you to get truly incredible images of your design work. Honestly, the phones in your pocket are more powerful than most of the DSLRs that I started this photography journey on. If you're lighting a play with a realistic interior and bright lighting, you really might be able to get away with iPhone photos as your only source.

The moment you start needing to deal with a lower-light situation, though, it's time to think about a "real" camera. Canon, Nikon, Sony, and Panasonic are the major players that most of the designers I know shoot with. They all have amazing equipment, but it's sometimes hard to dive in because once you pick and invest in a system, it seems impossible to change.

I have been working with Canon equipment since my very first DSLR in 2009. I couldn't tell you why I chose it back then, but it led down a long (and somewhat expensive) path to where I am now. In all of that time, I've actually only ever owned and shot with three cameras.

When I first started shooting my shows, the rigs were 100% incandescent with no LED products and very few moving / arc sources at all. Shooting was easy on my entry-level Canon Rebel and that camera lasted me several years before the LED revolution started. Once I started getting more mixed sources on my shows, I realized that my camera's sensor wasn't quite up to the task.

As my process refined itself (as it always is), I started shooting more dress rehearsals in-progress rather than staged photo calls. That meant capturing a ton of in-process action rather than actors standing still, and burst speed became very important to me.

An early shot from 2014 on the T5i — The Burnt Part Boys
Canon EOS Rebel T5i · EF 18-200mm f/3.5-5.6 IS
24mm · 1/100s · f/3.8 · ISO 400
An early shot from 2014 on the T5i — The Burnt Part Boys

In 2013, as I started doing more and more work with LEDs and moving lights (and followspots, but more on that later) I decided to do a small upgrade to the Canon T5i, still considered an entry-level camera but with better specs than my original. I also bought my first non-kit lens: a Canon EF 18-200 that I picked up used on keh.com for something like $400.

As a designer whose career was really in its infancy, that was a large investment. But I recognized then that the better the photo, the better the portfolio, which could lead to bigger shows and bigger paychecks. I made the investment in myself and my work, and it paid off. By the time I retired that camera, I'd shot well over 100 shows on it and I couldn't even begin to imagine how many photos.

Renting lenses

The lens makes all the difference, and is also just as expensive as a new camera sometimes. I started renting lenses back in 2014 as a way to experiment with different things and capture better photos without putting out a large amount of money all at once. There are lens rental shops EVERYWHERE; google them in your city.

Typically the prices are excellent. I was able to rent $3,000 lenses for $50 for a week and get such better shots than before, even with just my entry-level DSLR. It would take 60 shows at that rate before I neared the break-even number, so it made a ton of financial sense.

I wouldn't do this for every show, but if there was one that I REALLY wanted good images on, or had a unique shooting situation like a very wide set or very far shooting distance, rental lenses were my go-to. I frequently use Aperturent.

What I use nowadays

I shot on the T5i from 2013 all the way up until earlier this year, believe it or not. About a year and a half ago, I recognized that the photos I was getting of my work didn't adequately convey what I felt it looked like onstage. I would leave a show feeling pretty lackluster about how it turned out as I went through and edited photos, because they honestly just didn't capture the quality of the work I was doing.

In mid-2023, I decided it was time for a change. I started experimenting with renting camera bodies from the lens rental shops to evaluate what I wanted. I tried some different Canon cameras as well as dipping my toe briefly in the Panasonic range (I own a BGH1 for Vor and the idea of being bought into a single lens family was appealing to me), but I ultimately decided on the Canon R5.

I knew that I wanted a full-frame camera and that the most important things to me were the highest resolution image possible and the fastest burst speed possible, so that I could really freeze motion and dancing in busy dress rehearsals. I also wanted to not have to buy anything else for a very, very long time.

The R5 fit the bill, but talk about an investment: out the door from B&H, it was $3,351 NOT including a lens, but with a second battery. Woof. Again, I treat it as an investment in my work and my career, and it has already paid for itself as far as I'm concerned. I bought the battery grip separately from Amazon.

I decided not to buy lenses right away because I wanted to evaluate a couple of options. I shot photos from Beauty and the Beast on two rental lenses, the RF 24-70 and the RF 28-70. I'd previously used the EF version of the 24-70 many times, and had a feeling that's what I'd go for in the long run. And I was right. Comparing my three cameras over the years on DPReview is a fun side trip.

After confirming that the RF 24-70 would be my choice, I picked it up while in tech for The Twenty-Sided Tavern. That piece of glass cost me $2,285. So, a very large investment overall, but given my record of camera upgrades, I expect this camera to last me at least 10 years and probably far more before I even need to think about upgrading. It's the single most important piece of archival equipment I own, and each photo helps tell a story and sell my work to a producer.

A wide shot from a recent show on the R5 with the RF 24-70
Canon EOS R5 · RF 24-70mm f/2.8 L IS USM
26mm · 1/13s · f/22.0 · ISO 6400
A wide shot taken with the RF 15-35
Canon EOS R5 · RF 15-35mm f/2.8 L IS USM
20mm · 1/30s · f/8.0 · ISO 4000

I shot several shows this year with my new rig: my Canon R5 and RF 24-70. The first was Twenty-Sided Tavern, then Legally Blonde, then Jersey Boys. But like any gearhead, the wheels kept spinning and I knew I wanted just onnneeeee more thing for wider shots. I rented an RF 15-35 on Jersey Boys to get some really close shots, and was so blown away by what I got that I knew I needed to add it. Well, I probably could have just kept renting it as needed… but…

So I picked up a used RF 15-35 and rounded out my kit nicely. I've since used it on a few shows that I had to shoot very up close, like The Boy Who Loved Batman and A Raisin in the Sun. For both of these, I was essentially able to stand in the front row and capture the entire stage with no noticeable fisheye effect. Incredible stuff.

Taking the photos

As I mentioned earlier, I like to shoot my shows during a final dress rehearsal. I actually treat this as an extension of my design process, because it's a way I can see the show from a ton of different angles all at once. In an ideal world, the sound department hands me a FreeSpeak pack on the lighting channel and I can actively give notes with the team as I'm moving around. I have to apologize to them often about the shutter clicking in their ears. Sorry, Abby.

I think I have a bit of an unfair advantage when it comes to shooting because I have typically been in the room for weeks and know exactly what's coming next from moment to moment. I know where to move to get the shot I want, and to be honest I'm often thinking in tech about which moments I want and from where. My team can tell you, I've been known to say "oh that's going to be a GREAT photo…"

In most of the places I regularly work, I've become friends with the photographers who shoot the shows too. We compare shots, gear, etc. But I still only trust myself to get the shots I want. These folks are truly great, but they're just looking for different things than I am.

I like to get a variety of shots: wide, near, and everything in between. Many designers and teachers will tell you "get wide shots, those are what show off the whole thing," and while that's generally true, I think it's also important to tell a story with your photos. Including some close-ups and general mood-type things will go a long way to convey an entire show's design.

A wide shot taken on the RF 15-35
Canon EOS R5 · RF 15-35mm f/2.8 L IS USM
35mm · 1/500s · f/4.5 · ISO 6400

Shooting in RAW

A photo with significant noise reduction applied
70mm · 1/800s · f/9.0 · ISO 16000

I always shoot in RAW rather than JPG because I want as much control over the photo as I can get when editing. Shooting in JPG gives the camera the power to make decisions, and I don't like that.

There's not much of a point in me re-defining what a RAW image is, so I'll use Adobe's description:

RAW files contain uncompressed and unprocessed image data, allowing photographers to capture practically every detail they see in their viewfinder. The RAW file format stores the largest amount of detail out of any raster file type, which photographers can then edit, compress, and convert into other formats.

Read more about RAW →

Recommended settings

I'm sure this is what you're all here for: what modes and settings I suggest. Unfortunately I have a bit of a cop-out answer: it depends. I've tried to make sure standalone photos on this page have their settings under them, when space allows, so that you can get a sense of where things are.

There's no magical array of settings that gets you the "perfect" production photo. What we're shooting is probably one of the hardest things to capture: a low-light stage, moving subjects, a wide dynamic range of brightness (followspots vs. scenery vs. the floor vs. beams in the air), just about everything that all the photo blogs and books tell you to try to avoid. But here we are.

Shutter

A shot demonstrating fast shutter freezing motion
Canon EOS R5 · RF 15-35mm f/2.8 L IS USM
35mm · 1/1000s · f/2.8 · ISO 4000

You want a slow enough shutter to let in as much light as possible, but not so slow that motion appears blurry. If you're shooting a staged photo, you can typically get a much longer shutter speed because everyone can be still. If you're capturing movement, you'll need a faster shutter to freeze the action.

Think of it in lighting terms: imagine you're using a strobe and playing with the duration attribute. Longer duration, more you see, but you also might see the actor moving. Slower duration, less you see, but you can appear to freeze the actor in space.

Read about Shutter →

Aperture

A shot taken at a wide aperture
Canon EOS R5 · RF 28-70mm f/2 L IS USM
70mm · 1/500s · f/2.0 · ISO 4000

The aperture is the opening in a lens that controls the amount of light that can get in. Generally speaking in production shots, we want the widest aperture possible to let in the most light. The wider the aperture, the more expensive the lens.

In "real" photography, aperture is also how you adjust depth of field. The wider it is, the shallower the field and the more of a blurry-background effect you can get. In my experience with production shots, unless you're up very close to an actor, this isn't as important to worry about and I tend to go for the widest aperture possible.

Read about Aperture →

ISO

A shot taken at low ISO with clean tones
Canon EOS R5 · RF 15-35mm f/2.8 L IS USM
35mm · 1/50s · f/2.8 · ISO 800

ISO, or International Standard Organization, is a number that indicates how sensitive a camera's sensor is to light. The brighter your scene, the lower you can set your ISO. The higher you set your ISO, the more noise you introduce.

I'm not terribly scared of a little bit of noise, because it's relatively quick to clean up in Lightroom later.

Read about ISO →

The Exposure Triangle — a cheat sheet of shutter, aperture, and ISO
Image from SLRLounge.com

All three of these settings make up what's called the Exposure Triangle. Adjusting one means adjusting the others. Much like the sign hanging in your TD's office asking you to pick two priorities between good, fast, and cheap, it's nearly impossible to get all three of these settings exactly where you need them, especially in a quickly moving dress rehearsal.

What mode to shoot in

A shot of Bruiser the dog from Legally Blonde

With all of this in mind, I tend to shoot my shows in Shutter Priority mode. Shutter Priority means I have direct, quick access to changing my shutter speed. If you watch me shooting, you'll see me constantly rolling my shutter knob up and down based on what's happening on stage. I'm reacting to both the overall light level AND the amount of motion onstage.

If we're in a big dance number, I'm going with a faster shutter to stop the motion. The moment the motion stops and the characters sit at a table, I'm rolling that speed back down to give the sensor more time to capture light.

This means I don't think about my aperture. It would honestly be too much, at least for me, to be adjusting both on the fly. From my first camera up until I got the R5, I basically only worried about shutter speed and left ISO on auto.

With the RF series lenses, you have an additional control surface that's mappable to just about any parameter in the camera. Canon calls this a multi-function ring; it's right by the focus ring on the lens. I have mine mapped to ISO, and I'm doing lots of adjustments there throughout the evening as well.

Read about Shutter Priority →

What should the brightest thing be?

Musical theatre can be incredibly hard to shoot, and not just because of the fast dancing, flowing costumes, and saturated light. The hardest part? Followspots. There's such a range between the followspot brightness on someone's face, the wall of the set next to them, the upstage portal, the cyc, etc. Let alone trying to see the backlight beam on them when they stand DSC in the haze.

My recommendation in these situations is to make sure that the brightest thing in your photo is the thing that you are exposing the photo to. If Elle Woods is standing downstage center and the followspot is on her bright blonde hair, that's going to be it. On the camera, this might look pretty bad. It might look like nothing else is even lit, or is very dimly lit. But we'll fix that in the edit.

In my experience, it's much easier to boost up dark places in a photo than it is to recover a blown-out or overexposed part. Especially if that part is a human face.

If you're not using followspots, my answer is still pretty much the same: shoot for the brightest thing on the stage and then worry about the rest in editing. If your camera is on a tripod, you could even get super creative and shoot two shots: one with a fast shutter capturing the actors nicely, and another with a longer shutter to capture the set / surround. You could then composite those images together later.

A blown-out photo that probably can't be recovered
A blown-out photo that probably can't be recovered.

The editing process

A finished, edited production photo from The Twenty-Sided Tavern
Canon EOS R5 · RF 24-70mm f/2.8 L IS USM
46mm · 1/250s · f/2.8 · ISO 3200
A finished production photo from The Twenty-Sided Tavern.

My golden rule for editing:

The most important rule that I follow when editing my portfolio shots is to always commit to making the photo look as true to real life as possible. With Lightroom it's incredibly easy to completely change the lighting, color, and general feel of a photograph. This is an amazing tool for photographers, but a slippery slope into deception for lighting designers. I don't want to lie to people who are looking at the photos on my website; I want them to see as realistic of a representation of my work as I possibly can.

Same moment, edited three different ways

Same moment edited a first way
Edit 1
Same moment edited a second way
Edit 2
Same moment edited a third way
Edit 3

For photo editing, I mostly use Adobe Lightroom from start to finish, with the occasional touchup or adjustment in Photoshop. Lightroom is an incredibly powerful editing tool that also allows for quick watermarking, exporting at different sizes, and cloud-based album organization.

2020 editing webinar

In my COVID webinar series in 2020, I did a session on photography and my editing process. It's probably time for me to do another one and update the content there, but with what time? Maybe on my next show I'll do a live stream of my editing process.

Let's edit a photo together

The reference photo from The Boy Who Loved Batman that we'll edit together
Canon EOS R5 · RF 24-70mm f/2.8 L IS USM
24mm · 1/20s · f/4.0 · ISO 1600

For the rest of this post, I'll be showing the editing process on a photo from The Boy Who Loved Batman. If you want to follow along and experiment with the same photo yourself, you can download the camera RAW file from Dropbox.

Download RAW file →

The editing workflow

  1. 1

    Importing, picking, and rejecting

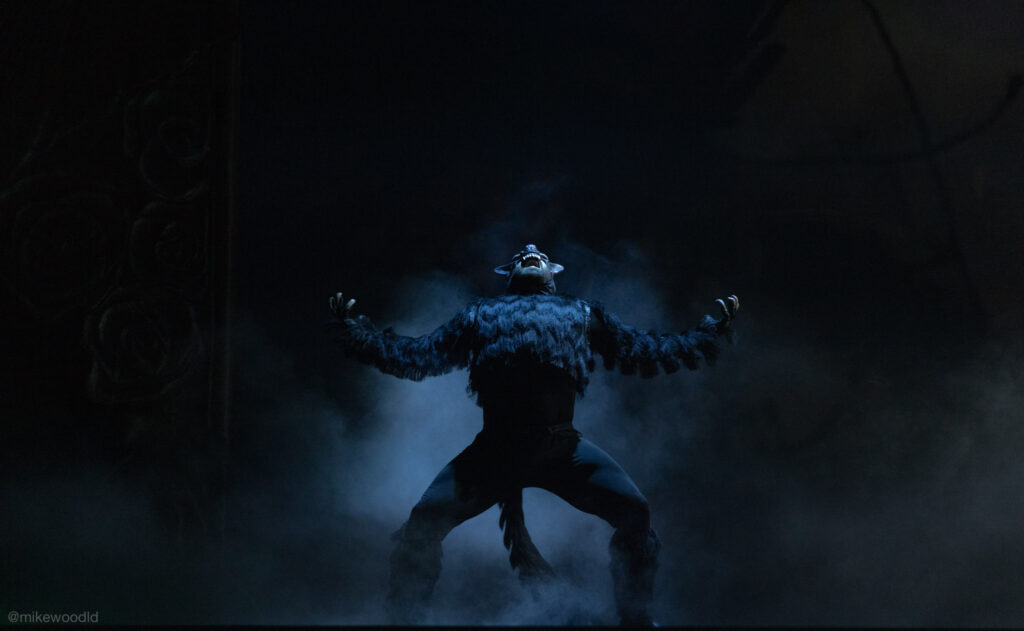
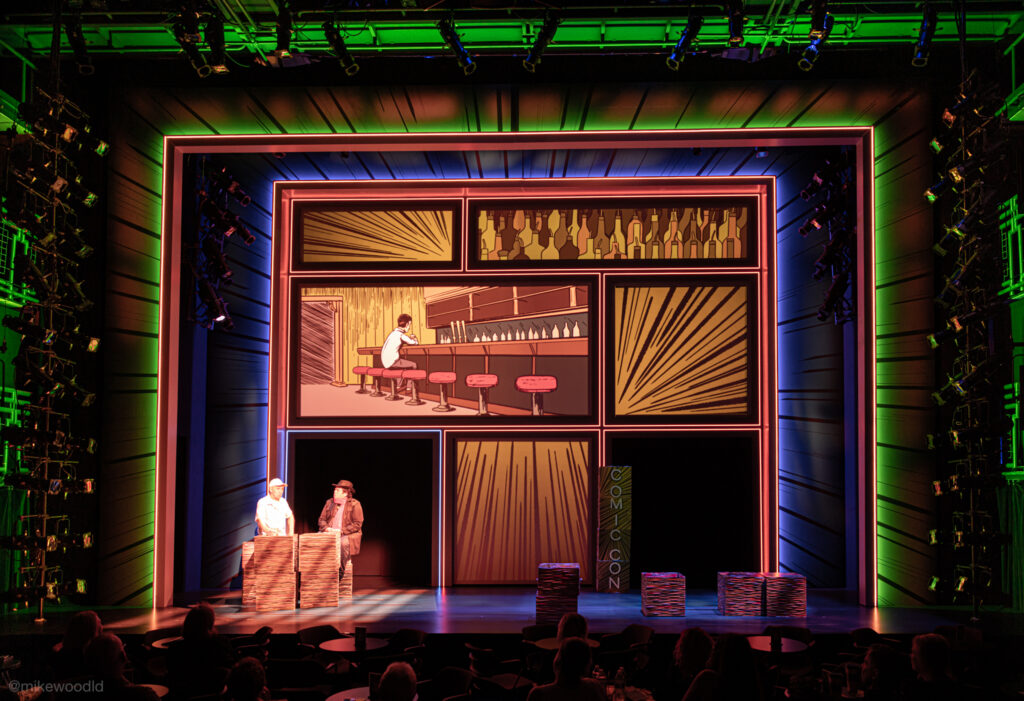
    This is the most tedious part of the process. I shoot a LOT of photos because with a fast moving moment, 1 out of 4 or 5 might be useable. This is a little less important now that I have a much better camera, but you never know. When I was shooting on the T5i, I would typically shoot 3,000 to 4,000 shots in one night and only a couple hundred would be useful. From those, maybe 20 to 40 would make the final cut. With my R5, I'm shooting about half that amount but still getting the 20 to 40 good ones.

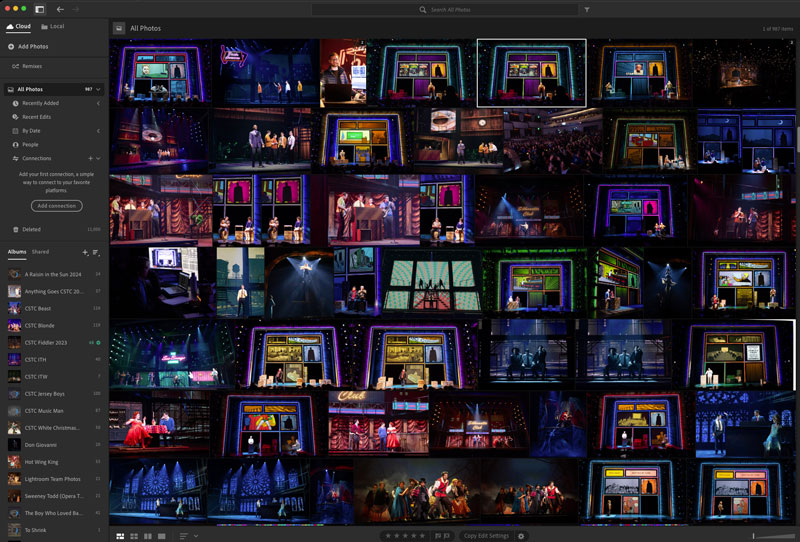
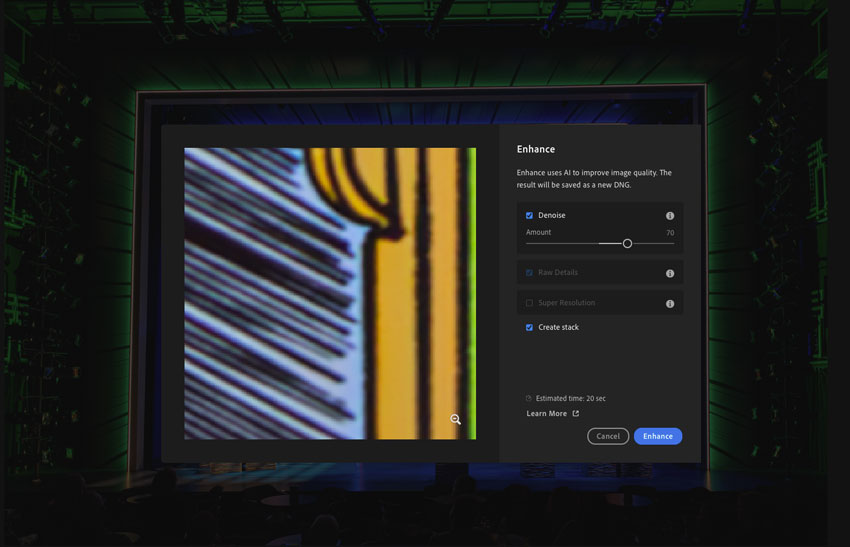
    I pull the SD card from my camera and import all of the RAW files right into Lightroom to start. I have an external 4TB SSD that I use to host my Lightroom library so it doesn't take up internal hard drive space.

    Backups in our business are a blog post for another day, but generally I back up my Lightroom Library SSD to my NAS after every show, and the actual final edited photos are in Dropbox which automatically pushes them to two separate drives in my NAS, both of which are also backed up in a RAID scenario. So I'm pretty safe there.

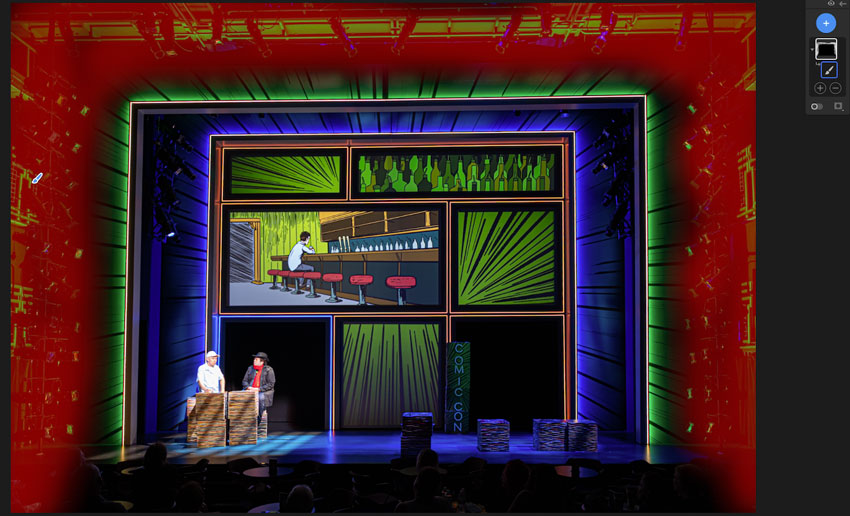
    Lightroom uses the concept of picking and rejecting. You quickly pop through the photos and choose one of those two options, which lets you weed out shots you know you don't need: blurry shots, poorly framed shots, shots where the actor made a weird face. Then you filter your photos and delete the rejected ones.

  2. 2

    Rotate, crop, fix skew

    After one or two pick / reject passes, it's time to go a little deeper. By now I've seen all the photos I'm keeping at least once or twice, so I have a pretty good sense of what I'm looking for. Sometimes you get that "perfect" shot you want to start with right away.

    Cropping and rotating is the next step for me. Depending on the set, I also might do some skew adjustments. Batman is a great example: the shot was taken from the ground, making the square portals appear to have a very tall perspective. Sometimes that looks cool, but I also wanted a few shots that were more squared up. Lightroom made it a breeze.

    Before — original perspective
    Before
    After — squared up via skew adjustment
    After
  3. 3

    Edits — fix things before adjusting levels

    Now I start looking for things that need fixing before any level adjustments are made. This is a different photo from the Batman one, but it's a good example. In this production of The Music Man, there was a little bit of white gaff tape that was temporarily on the underside of the bridge to hide a paint note for photo night. I was able to use the removal tools in Lightroom to quickly take it out.

    Canon EOS R5 · RF 24-70mm f/2.8 L IS USM
    70mm · 1/225s · f/2.8 · ISO 1600

    Before — gaff tape visible on the bridge
    Before
    After — gaff tape removed
    After
  4. 4

    Brightness and exposure

    Before — original exposure
    Before
    After — exposure pulled down, shadows boosted
    After

    Now it's time for the magic. I typically start with exposure. If the image is a little too bright, I'll pull it down. In this image, I felt like the actors were a little too bright, so I pulled down the exposure overall and pulled the highlights down as well.

    I almost always boost shadows, because that's where the magic is. Since we're shooting for the brightest thing on the stage during the capture, other things get easily left in the dark. Adjusting the shadows and black levels really helps pull them out.

    Spend time in the RAW file playing with all of the light settings. Take them all the way up and down and see the differences.

  5. 5

    Colors — temp, tint, vibrance, saturation

    I typically don't do a ton of color tuning because of my golden rule: I don't want to change things from what the actual audience saw. But sometimes there are little adjustments to be made to get them true to life. Again, play with these sliders on the RAW photo and see just how different the photo can be.

    Same goes for vibrance and saturation: I don't touch these much. Sometimes I'll boost a little vibrance, but not much.

    In the example here, I took it to an extreme, violating my golden rule. It looks… bad.

    An over-saturated edit that violates the golden rule
    Pushed too far on purpose.
  6. 6

    Noise reduction

    The Lightroom noise reduction panel

    One of the most important parts of the process for me. Because of the nature of what I'm shooting, it's almost impossible to get a photo without noise. The Lightroom manual noise reduction features are pretty great: they basically blur each pixel ever so slightly. Lightroom also has an incredibly powerful AI noise reduction tool.

  7. 7

    Lens corrections

    Depending on the lens I'm using, I will allow Lightroom to apply lens correction presets to the image. These mostly have to do with the fish-eye type geometry of the captured image.

    Lens correction profile selection in Lightroom
  8. 8

    Masks and spot corrections

    A custom mask in Lightroom on the Batman photo

    Lightroom in the past few years has become incredible at automatically detecting and creating masks for you. Think of a mask as a selection of part of an image you can selectively edit, like a person or a sky.

    In the sample image, I did a custom mask and brushed around the outer portal to selectively pull up the brightness of the lighting booms surrounding the set. Always following my golden rule, but remembering that the photo was originally exposed to the actors and not the dark surrounds.

  9. 9

    Exporting as JPGs

    The final step is to export the edited images as JPG files. I do this twice. Once in full quality mode at the highest resolution possible, and again with the quality rolled back a bit and the overall size smaller for use on my website. In both cases, I add a small social media watermark to the bottom left with a bit of transparency.

    I also typically throw all the JPGs into a quick Apple Photos album so I can get to them quickly for posting and such.

    An Apple Photos album of finished exports

More samples and their data

Sample production photo
Canon EOS R5 · RF 24-70mm f/2.8 L IS USM
70mm · 1/160s · f/2.8 · ISO 1600
Sample production photo
Canon EOS R5 · RF 15-35mm f/2.8 L IS USM
35mm · 1/50s · f/2.8 · ISO 640
Sample production photo
Canon EOS R5 · RF 24-70mm f/2.8 L IS USM
56mm · 1/640s · f/4.5 · ISO 6400
Sample production photo
Canon EOS R5 · RF 15-35mm f/2.8 L IS USM
35mm · 1/320s · f/7.1 · ISO 4000
Sample production photo
Canon EOS R5 · RF 24-70mm f/2.8 L IS USM
50mm · 1/200s · f/2.8 · ISO 1600
Sample production photo
Canon EOS R5 · RF 24-70mm f/2.8 L IS USM
24mm · 1/160s · f/3.2 · ISO 2000
Sample production photo
Canon EOS T5i · EF 24-70mm f/2.8 L II USM
24mm · 1/500s · f/2.8 · ISO 3200
Sample production photo
Canon EOS T5i · EF 18-200mm f/3.5-5.6 IS
32mm · 1/200s · f/4.0 · ISO 1000
Sample production photo
Canon EOS R5 · RF 28-70mm f/2 L USM
58mm · 1/320s · f/2.0 · ISO 4000
Sample production photo
Canon EOS 5DS · EF 24-70mm f/2.8 II USM
24mm · 1/80s · f/2.8 · ISO 3200
Sample production photo
Canon EOS R5 · RF 24-70mm f/2.8 L IS USM
43mm · 1/125s · f/5.0 · ISO 2500

Wrapping up

Well, that's it. I know this is a very high-level guide, but I'm hopeful that it can at least get you asking the right questions and thinking about the right things.

A closing production photo
Canon EOS R5 · RF 24-70mm f/2.8 L IS USM
24mm · 1/400s · f/2.8 · ISO 10000